Monday, February 29, 2016

Chicken Paprikash


I’m still not sure how to pronounce it, but I sure know how to eat it! This dish comprises everything I love in a good chicken recipe: delicious, easy, interesting, and not soaked in a half gallon of oil. (I know that last attribute is really setting the bar high.)
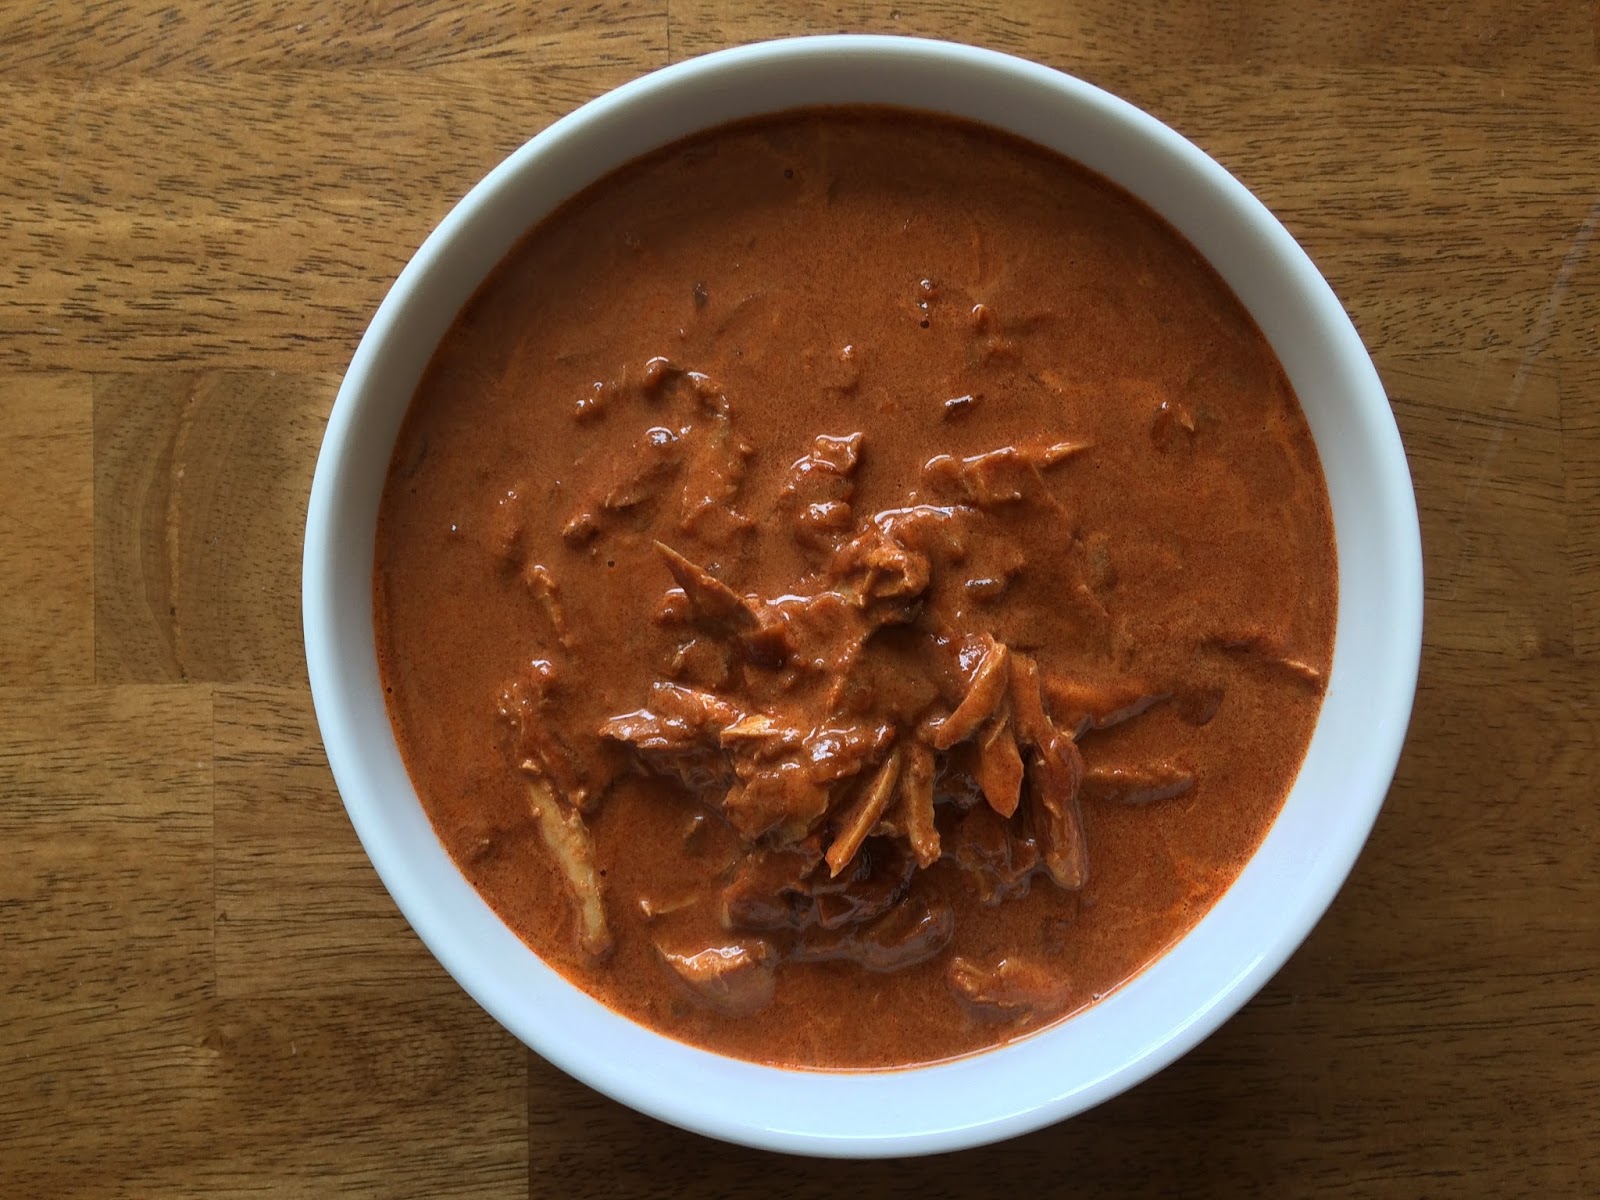

I’ve had this recipe bookmarked for close to half a year and finally got around to trying it last week. I then proceeded to make it again…and again…all in the same week. In my defense, I shared a lot of the goods, but the fact that I made this recipe 3 times in 7 days underscores how good it is.

I can summarize the recipe thusly: sauté onion, add paprika, add chicken and water, simmer for 1 hour, shred chicken, add sour cream and flour, season with salt and pepper. It’s really that easy, yet the flavor is rich and complex. The paprika, onion, chicken, and sour cream combine into a savory, creamy, warmly spiced (but not spicy) sauce; and the chicken is super tender from the long braise. It goes perfectly over a bowl of rice with a good book and a fuzzy blanket.


A couple notes on ingredients:
Chicken – the original recipe calls for bone-in thighs or chicken breasts, quartered. I have only tried this recipe with dark meat, as all my local grocers seem to be anti-bone-in chicken breasts. I imagine you could also try boneless, though. I have tried both thighs and drumsticks, and both tasted great. However, it was a pain in the derriere to get the skin off the drumsticks, and the sauce ended up way fattier than when I used thighs.
Paprika – you don’t need to use the fancy stuff, but it should be fresh. The original recipe asserts the more paprika the better. I agree and would add that you don’t want to be using old, pale, sad paprika. Feel free to buy the cheap-o brand, though. As long as it’s fresh, the end result will be really good.

Fun Fact: The dark parts of poultry are dark due to more myoglobin, which is an iron-containing protein in muscle. Ergo, the dark meat contains more iron than the light meat. This is a boon for iron-deficient, budget-conscious shoppers such as myself. If you want to maximize your iron absorption, eat it separately from calcium-rich foods because calcium and iron compete with each other.


Chicken Paprikash
From Food52.com

2 tablespoons vegetable oil
1 large onion, diced
4 heaping tablespoons paprika
4 bone-in chicken thighs, with skin and excess fat trimmed away (or 2 chicken breasts or 5 drumsticks)
1¼ teaspoons salt
½ cup sour cream
1 spoonful (approximately 1 tablespoon) all-purpose flour
Salt and pepper to taste

Heat the oil in a medium-large pot over medium heat, and sauté the onions until soft. Add the paprika, and continue to sauté, stirring very frequently, for a couple of minutes. Add the chicken to the pot, and sprinkle salt over. Stir everything together until the chicken is coated in the paprika.

Here is where I diverge from the recipe slightly: the original states to let the chicken brown slightly, but I forgot to do this the first time, and it still turned out great. Due to laziness, the most I have done is get the chicken slightly de-pinked. So, do what you want. Follow your instincts. Browning probably concentrates and enriches the flavors a bit.

Add 2 cups water, and bring to a boil. Turn down the heat, and simmer partially covered – I like to prop the lid with a wooden spoon – for 45-60 minutes until the chicken is cooked through (165 degrees Fahrenheit). Remove the chicken to shred it, and discard the bones. Whisk the sour cream and flour together, and stir into the paprikash broth. If the sauce is thinner than you want it, then boil it down to the desired consistency while the chicken is removed. Add the chicken back to the pot, and heat through. Serve over rice or with dumplings. Or both!

Friday, February 12, 2016

Mexican Black Beans


Every time I eat beans, I ask myself why I don’t eat them more often. For such a humble and inexpensive food, they’re surprisingly delicious, healthy, and substantial. They come in enough varieties and are used in enough world cuisines that I could eat them for a long time and not get bored. So if you, like me, are resolving to eat more beans this year, here is a great preparation to add to your repertoire.

These Mexican black beans are fantastic over Mexican rice, plain rice, on their own, or as a side. They’re nice and toasty from all the cumin and fresh from the cilantro and lime. You can keep this dish really easy and fast by using canned beans or you can make it cheap and folate-rich by using dried beans. These aren’t too shabby topped with shredded cheese either.

A note about using dried beans: don’t do what I did and try to be all “efficient” by using up the last bit of an old bag of beans along with some newer beans. Just don’t. Half of them will be all mushy while the others stubbornly refuse to soften. Stupid beans.

Some of the beans turned PURPLE after soaking!

 Fun Fact: Black beans are high in folate, containing about 32% the Recommended Daily Allowance in ½ cup boiled. (High-heat cooking destroys folate, so canned beans have less folate than boiled dried beans.) Folate is important for DNA synthesis, cell division, and the formation of hemoglobin.


Mexican Black Beans
Adapted precious little from epicurious.com

1 cup dried black beans (or 2 15-oz. cans)
1 Tablespoon olive oil
4 garlic cloves, minced
1 jalapeño chili, seeded and diced fine
heaping ½ teaspoon ground cumin (toasted and ground at home is preferable)
14.5 oz. can low-sodium chicken broth (or water + chicken soup base)
Juice of ½ lime, plus more to taste
3 Tablespoons chopped cilantro, plus more to taste
Salt and pepper to taste


If using dried beans, sort, rinse, and soak overnight with 2 inches (or about 3 cups) of water covering the beans. After soaking, drain the beans, and cover with fresh water by about 2 inches. Boil for 1½ - 2 hours, until very tender.* Alternatively: cook beans in a slow cooker on high for 3-4 hours. Alternatively to the alternative: cook beans WITHOUT pre-soaking in a slow cooker for 3-5+ hours (I find the soak helps the texture, though).

*The cooking time will vary depending on the age of the beans, your elevation, the hardness of the water, etc.


With your cooked/canned beans ready, you can prepare the dish. Heat olive oil in a large-ish nonstick frying pan over med-high heat. Add minced garlic, jalapeño, and ground cumin, and sauté for about 30 seconds. Add cooked beans and chicken broth, and cook together for about 5 minutes, stirring occasionally. With a masher, crush as many beans as desired to get a chunky or smooth consistency. Continue to boil until the mixture has thickened as much as desired. Add lime juice, cilantro, salt, and pepper to taste.

Friday, January 1, 2016

On Resolutions

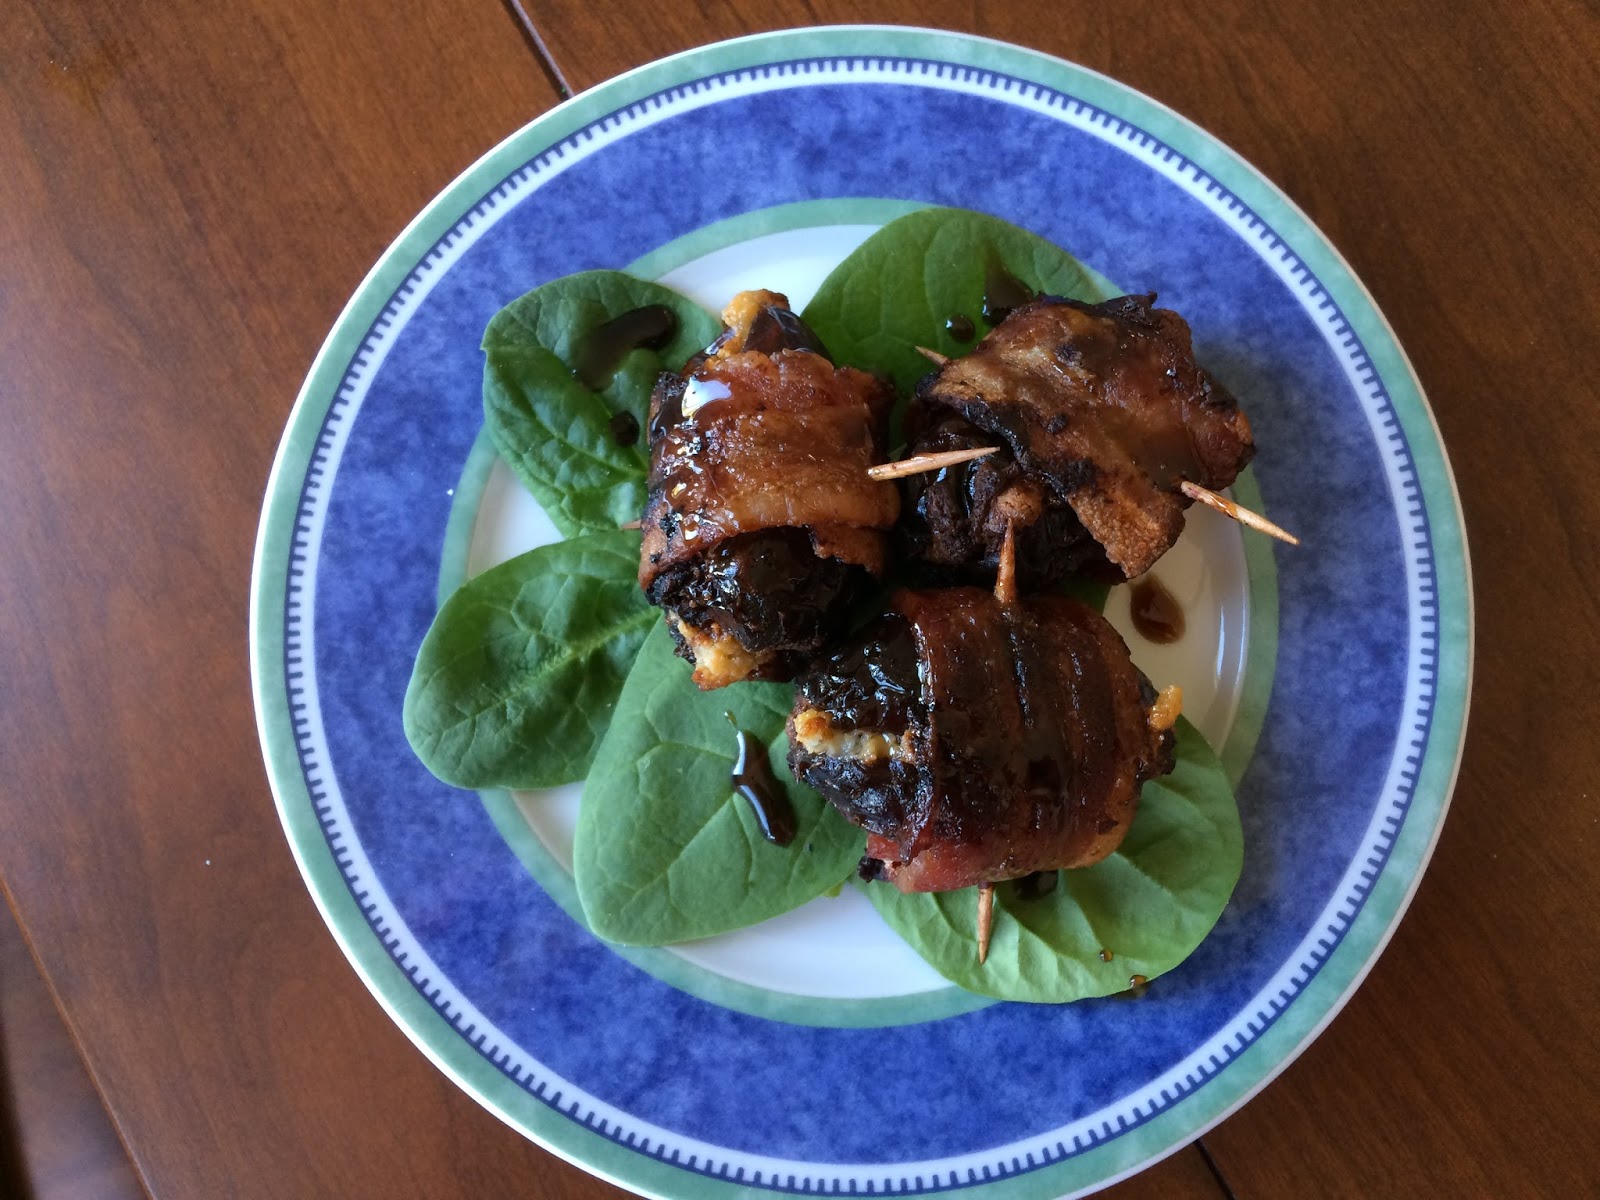
I made these bacon-wrapped dates today. Though delicious, they didn’t taste exactly as I wanted them to. Part of me is determined to continue my attempts until I get the recipe just right, but this would essentially mean resolving to eat more bacon, which may or may not conflict with some of my other goals for the new year.


In short, use the recipe below as a jumping off point, and feel free to tweak as you please. Here are a few things that I would do differently on a second attempt. 1) Greatly increase the blue cheese to cream cheese ratio. I would try 75%, or maybe even 100%, blue cheese. 2) Use smaller dates. While the medjools were meaty and delicious, they somewhat overwhelmed the cheesy filling. 3) Salt the filling, if needed. I think it would depend on how much cream cheese you opt to use.

Alterations aside, these were a deliciously salty, sweet, tangy snack. The bacon crisped up beautifully in the oven, while the exposed parts of the dates got deliciously caramelized. The balsamic drizzle was inspired by a similar dish I tried in Laguna Beach, and it adds a nice acidic counterpoint to all the richness.

And since I couldn’t offer you a perfect recipe myself…
If you’re in want of any resolutions for 2016, perhaps yours could be to try one of these delicious potato recipes:
     Hasselback Potatoes from this site, or
     Cheesy Potato Cups from over here
I eat potatoes fairly often, and I enjoy having a variety of stellar preparation methods up my sleeve. And frankly, these are stellar. So click click, eat eat.

Fun Fact:
Dates are a good source of fiber and potassium, a mineral with many vital functions. Potassium is necessary for muscle contraction and works with (or rather, against) sodium to regulate blood pressure and fluid balance in the body.


Bacon-Wrapped Stuffed Dates

Medjool Dates, scored lengthwise and pitted
Cream Cheese
Blue Cheese
Smoked Bacon
Toothpicks

2 Tablespoons Brown Sugar
1 Tablespoon Water
1 – 1½ teaspoons Balsamic Vinegar

Preheat oven to 375 degrees Fahrenheit. Mix equal parts cream cheese and blue cheese. Stuff 1 tsp of cheese mixture into pitted dates. Wrap ½ slice of bacon around date, and secure with toothpick. Bake on an ungreased baking sheet for 40 minutes, flipping each date halfway through, until bacon is browned and crispy. Let cool on (or over) a paper towel.

Boil the brown sugar, water, and Balsamic vinegar together until reduced and syrupy. Drizzle desired amount over the stuffed dates.

Thursday, December 24, 2015

Pear Butter


I generally have a hard time with summer ending. The fruit aisle at the grocery store transitions from stands bursting with cherries, berries, and peaches to a pathetic selection of approximately three fruits that are actually good in winter plus a bunch of pale, anemic fruits that are coaxed to survive through the dead of January. The plus side is that the few good winter fruits are very good and very versatile. Pears are one such fruit, and I think they are underappreciated. If you disagree, perhaps this pear butter can persuade you otherwise.


In case you’re new to fruit “butter,” it’s simply fruit that has been cooked and pureed to a thick spread and sweetened. It often has spices added. I like it because it’s more full-bodied and less overwhelmingly sweet than jams and jellies. Also, it’s really easy to make (no pectin required). For this recipe, you pretty much just chop pears into a crockpot, stir it now and then, and then add sugar and a few spices.

This pear butter has just the right amount of sweet and spice. It makes a great addition to morning toast and is fancy enough to give as a gift. If you can bear to part with it, that is.

Fun Fact: Fruits in general are a good source of vitamin A, vitamin C, potassium, and fiber. Potassium is a mineral with many vital functions in the human body, including nerve transmission and muscle contraction. Minerals can be lost in cooking water, but they are not destroyed by heat.


Pear Butter
Adapted from Food in Jars by Marisa McClellan
5 cups chopped pears, cored but unpeeled (I used Bosc pears and was very happy with the result, but the recipe doesn’t specify a variety)
1 teaspoon cinnamon
½ teaspoon ground ginger
¼ teaspoon ground nutmeg
1/8 teaspoon ground cardamom
juice of ½ lemon
1 cup sugar, can add more to taste

Place the chopped pears in a crockpot, and cook on low, covered, for 1 hour.

Stir the pears, and prop the lid slightly open by a wooden spoon or other utensil. Continue to cook for about 5-7 hours, stirring the pears every hour. After 4 hours, mash and or blend the pears to the desired consistency. Stir in the spices.

During the last hour of cooking, add lemon juice and sugar to taste. Continue to cook until the mixture is thick and spreadable, and then store in a jar in the refrigerator. Enjoy on toast, fruit, yogurt, etc. Makes about 2½ - 3 cups, depending on how thick you make it.

Monday, November 30, 2015

Dark Chocolate Orange Pistachio Bark


More often than is probably normal, the moments before I fall asleep at night are spent thinking about things I want to eat. This recipe began just that way about one year ago, also near Christmas, a time when everything I want to make seems to involve chocolate, ginger, or copious amounts of cheese piled on starchy things.

This recipe is decidedly chocolate-focused. I used a nice bittersweet chocolate bar because I love dark chocolate and orange together. They’re incredibly fragrant, floral, and holiday-ish in combination. The pistachios add a nice mild, slightly salty crunch that goes perfectly with the chocolate and orange. Also, they look pretty.


This recipe is very easy to make, and it gives me a sense of accomplishment to make my own candy (and eat it). You can feel even more accomplished by candying your own orange peel, or you can just buy it already made. I won’t judge you.

Fun Fact: Pistachios contain lutein and zeaxanthin, both of which are carotenoids (yellow-red-orange pigments) that are involved in retina health. Those who eat foods high in lutein and zeaxanthin may have lower rates of age-related macular degeneration.


Dark Chocolate Orange Pistachio Bark
3½ oz. bittersweet chocolate
3 Tablespoons shelled, roasted, salted pistachios
2 teaspoons diced candied orange peel (instructions for candying below)


The measurements above are to taste and can be altered as desired.
Chop the chocolate, and melt in a double boiler. (I use a glass bowl set over a pot with about an inch of simmering water.) While the chocolate is melting, shell the pistachios, if not already done, and chop to whatever size you want in the bark. I did mine in approximate halves and quarters. Spread the melted chocolate to desired thinness over waxed paper. Distribute the pistachios and orange peel prettily over the top. Let the chocolate cool and harden for 2-3 hours, then break into pieces. Store unlikely leftovers in an airtight container.


Candied Orange Peel
2 oranges
1 cup water
1 cup + 2 Tablespoons sugar

Prep: Bring two small-medium pots of water to boil (or just one – you decide after reading instructions). Rinse oranges thoroughly. Slice the ends off of each orange, then score the peels so that there are two peel hemispheres on each orange. Carefully remove the peels without ripping into smaller pieces, and then slice into 1/8 or 1/4-inch slices.

Blanching: Blanch the sliced orange peels in boiling water twice for about 3 minutes each time, rinsing the peels and changing the water after each blanch.

Candying: Stir together the water and sugar until sugar is dissolved, and bring to a gentle boil. Place the orange peels in the syrup, and boil for about one hour, checking occasionally to make sure the water hasn’t boiled away. Note: I have made these twice, and the first time, I found an hour to be too short because the orange peels were limp, though delicious. The second time, I went closer to 75 minutes, and it worked pretty well, though some might find them too sticky. You can try lifting them with a fork during cooking to check progress.

Cooling: Remove the candied peels from the syrup, and place on a cooling rack set over a plate or waxed paper to catch the drips. Let cool thoroughly. The orange peels will stiffen as they cool.

Monday, November 9, 2015

Caramel Apple Cake


If you like the idea of caramel apples but get overwhelmed by the apples, this is the cake for you. If you like desserts with plenty of butter, sugar, and happiness, this is the cake for you. If you like desserts that typify everything that is good about autumn and life itself, this is the cake for you.

Apple Carnage


This seasonal beauty comes from the King Arthur Flour website, which has yet to lead me astray. There are a few steps involved in the assembly, but none are difficult, and each is well worth it. This cake is moist, intensely apple-flavored, and pleasantly spiced. It’s warm and autumnal and crowd-pleasing.

Deceptively Unattractive
From Drab to Fab 
I must warn you that should you decide to disregard the recipe’s advice to use a deep cake pan, you will have batter and caramel ooze out and burn on your oven floor. I saved myself the second time around by putting a sheet of tin foil underneath the cake while it was baking. To be honest, though, I rather like that it overflows a bit. I’m always left with deeply browned, extra-caramelized bits that I have to cut off to get the cake out of the pan. I took a plate of these crispy-licious bites around my apartment, and my roommates and I devoured them greedily. They make a nice appetizer while you’re waiting for the cake to cool.


Fun Fact: Cake is good for the soul. Also, it increases your levels of friendship, which is definitely health promoting.


Caramel Apple Cake

Not really adapted at all from kingarthurflour.com

Topping:
2 small apples, peeled and sliced between 1/8-1/4 inch thick*
4 Tablespoons butter
¾ cup brown sugar, packed
2 Tablespoons frozen apple juice concentrate, thawed
¼ teaspoon cinnamon
½ cup light corn syrup

Cake:
¾ cup canola oil
1 cup brown sugar, packed
2 Tablespoons frozen apple juice concentrate, thawed
2 large eggs
1½ teaspoons cinnamon
¼ teaspoon ground ginger
1/8 teaspoon ground cloves
½ teaspoon salt
1 teaspoon baking soda
1½ cups unbleached all-purpose flour**
1 medium apple, peeled and finely chopped
(The original recipe includes ¾ cup chopped walnuts or pecans, which would definitely cut the sweetness. However, I have a childlike palate and don’t want to cut the sweetness.)

Preheat the oven to 325-350 degrees F. (I have only baked this in Utah, and 350 seemed excessive for my particular oven. I usually preheat to 350 and then turn down to 325 or even a little lower once I put the cake in. Peek at the cake after about 10 minutes to see how quickly it’s browning.) Grease the bottom and sides of a 9-inch round cake pan that is at least 2-inches deep (see commentary above). Cut a circle of parchment to line the bottom of the pan, and grease that as well.

To make the topping:
Place the butter through corn syrup in a saucepan, and heat over medium flame, stirring occasionally until the brown sugar is dissolved. It’s okay if it reaches a gentle simmer.

Place the sliced apples in a ring around the bottom of the pan, overlapping each other. Place a few extra slices in the center so it isn’t lonely.

Pour ½ cup of the caramel over the sliced apples, and set the remaining caramel aside.

To make the cake:
Beat the oil, brown sugar, juice concentrate, spices, and salt at medium speed for about 2 minutes. (You can do this by hand easily enough too.) Mix the flour and baking soda together separately, and then stir into the batter a bit at a time. Finally, stir the chopped apples into the cake batter.

Drop the batter in large spoonfuls over the apple topping, and spread smooth. Bake for 50-55 minutes until a fork or cake tester inserted in the center comes out clean. Let the cake cool for five minutes in the pan. Then, run a knife around the edge, and invert onto a plate.

Reheat the reserved caramel sauce, and boil for 30-60 seconds to thicken, if desired. Keep in mind that it will thicken as it cools. Pour desired amount of caramel over the cake, letting it drizzle down the sides. I usually have extra caramel, but you could definitely use all if wanted.

*You can really use any variety that you like. I’ve tried both Red Delicious and Fuji.

**I may or may not have accidentally left out ½ cup flour the last time I made this. I admit nothing, except that this cake has been delicious every time. Good thing it’s hard to mess up.