Monday, June 26, 2017

In Which an Alaskan Pollock and a Bangladeshi Chapati Travel Together to Latin America and Have a Marvelous Time


I admit I don’t know what to call these. In my mind, they’re Indian fish tacos, being neither authentically Indian nor authentically tacos. So, maybe they’re “Indian” Fish “Tacos” (not Indian “Fish” Tacos) or maybe they’re just Hipster Fish Sandwiches. Whatever. At any rate, please eat them because they are delicious, and then maybe you can tell me what their proper name is.


This dish came about because of a “when life gives you lemons, make lemonade” scenario. Just replace the word lemons with “disgustingly under-ripe papaya” and the word lemonade with “chutney!” and you’ll have a good idea of what happened. So with a large quantity of delicious chutney hanging out in my fridge, I began scheming about putting it on top of a nice mild fish. I was also in the mood for fish tacos. Taking the flavors from the chutney as my cue, I decided to add a twist and use whole wheat chapatis instead of tortillas. I finished my “tacos” off with a toasted cumin and lime slaw, bringing some earthy crunch to balance the sweetened papaya. I hope you enjoy these as much as I do.


Anglo-Indian-Inspired Fish Flatbread Sandwiches of Appalling Inauthenticity

Fish
Three 4-oz. frozen tilapia or Pollock filets
butter, to taste
paprika, to taste
salt, to taste
lime or lemon juice, to taste

Bake fish on an oiled baking tray for the length of time specified on the package, or until the fish reaches 145 degrees Fahrenheit internally. Remove fish from oven, and immediately place a small pat of butter on each filet, moving it around to melt. Sprinkle with paprika, salt, and citrus juice to taste.

Toasted Cumin Slaw
½ teaspoon whole cumin seeds
1½ cups shredded green cabbage
2 Tablespoons mayonnaise
1½ - 2 Tablespoons lime or lemon juice
salt to taste

Toast cumin seeds in a dry skillet over medium heat, tossing occasionally, until golden brown and fragrant. Combine all ingredients, adding more cabbage if too wet or more mayonnaise if too dry. Chill until ready to use.

Chapatis (adapted from Hot Bread Kitchen)
1 cup minus 1 Tablespoon water
½ teaspoon salt
1 cup plus 2 Tablespoons whole wheat flour

Bring the water and salt to boil in a pot with a well-fitting lid. Once fully boiling, add all the flour, and mix thoroughly with a spoon, wooden or otherwise, to incorporate. Place the lid on the saucepan, and let sit for about 2 minutes so the flour can hydrate.

Place the hydrated dough into a mixing bowl/Kitchen Aid (or continue right in the pot), and mix with dough hook or other utensil until the dough is stiff and resembles cookie dough. (The original recipe states some number of minutes for this, but I find that mine reaches this point almost instantly, and thus I never mix for very long.)

Remove dough from pot, and place on a lightly floured work surface. Knead carefully – it’s hot! – until dough comes together in a smooth ball. Roll the dough out into a log, and divide into six equal portions. Roll each portion into a ball, and flatten slightly.

Place a dry skillet – cast iron works great here, but nonstick works too – over medium heat. With a floured rolling pin, roll each dough disk into a chapati circle about 6 inches in diameter. Cook chapatis one at a time: let cook 15 seconds on the first side, and then flip and cook 45 seconds on the other side. Flip once more, and let cook an additional 30-60 seconds until golden. On this flip, the chapati may puff up like a balloon, filling with steam. If the chapatis are browning too quickly or slowly, adjust the heat accordingly.

A proudly puffed chapati
 Chutney (at least ¾ cup)
You could make papaya chutney from this site* OR you could just buy a nice chutney from the store.

*I used this recipe, heavily adapted. I didn’t have fresh ginger, so I used between ¼ - ½ teaspoon ground ginger. I also substituted ground spices for whole (pinch of black pepper and 1/8 teaspoon or so of ground cardamom, more of both to taste. Finally, I used a bit less vinegar than stated (try ¾ the amount first). And I didn’t wait a month to eat it. I ate it immediately. That’s how I roll.


Makes enough for about 6 tacos.

Tuesday, May 23, 2017

Chermoula


I’d like to introduce you to my new friend, chermoula. Though we met scarcely two and a half weeks ago, we have become fast friends. We do everything together. Or, at least, I hope we will soon.

Chermoula, or charmoula, is an herb sauce or marinade used in various North African cuisines. It varies from region to region in its exact composition, but a typical Moroccan preparation uses parsley. This is the kind I first tried at a little Moroccan restaurant in upstate New York. It came on a colorful plate, surrounded by warm, toasted triangles of pita bread. For an unassuming green sauce, it packs a lot of flavor. It is wonderfully fresh from the herbs, bright from lemon juice, and earthy from cumin and other spices. It was my favorite dish of the evening, despite trying many other wonderful things. Now that I know how easy it is to make at home, it may become a permanent resident of my refrigerator.

Chermoula is typically served with fish or meat and also goes great with fresh bread or roasted vegetables. I tried roasting diced potatoes in chermoula. In retrospect, it might have been even better to roast the potatoes on their own (diced, with olive oil and salt in a 425 degree oven) and then put the sauce on, but it took restraint to stop eating them even the way I did it.

Fun Fact: Parsley and cilantro, along with other leafy greens, are rich in vitamin K. This vitamin is essential for making blood-clotting proteins in the body. Vitamin K deficiency is rare, however, because certain bacteria in your intestines produce it. Babies are usually injected with vitamin K at birth as a precaution because they have not yet developed as many intestinal bacteria.


Chermoula
Adapted very minimally from NYT Cooking

2 teaspoons cumin seeds
½ teaspoon coriander seeds
2 cups parsley (medium-large stems removed), about 1-2 bunches
1½ cups cilantro (stems mostly removed), about 1 bunch
3 large cloves garlic
1/3 cup extra virgin olive oil
¼ cup fresh lemon juice
½ teaspoon salt, more to taste
1 teaspoon paprika
1/8 teaspoon cayenne pepper

Toast the cumin and coriander seeds together in a small skillet over medium heat, tossing/stirring occasionally until fragrant and slightly darkened. Let cool, then grind in a mortar and pestle or electric spice grinder. Set aside.


Peel and halve the garlic cloves. Add the parsley, cilantro, garlic, olive oil, and lemon juice to a food processor or blender or tall narrow vessel (if using immersion blender). Chop/blend until the herbs and garlic are well chopped and incorporated into the lemon juice and oil. Add the remaining ingredients and reserved spices, and continue to chop until the mixture has reached a smooth paste-like consistency. Add additional salt, lemon, or garlic to taste.

Saturday, February 18, 2017

Fudgy, Fuss-less, Flourless Chocolate Cake


Hopefully you’re not too sick of chocolate after Valentine’s Day. And if you are, well, at least bookmark this for later because I’m excited to tell you about my birthday cake. I like to make my own birthday cake because it’s fun, I ensure that I get the cake I want, and I get to “clean” the batter bowl without sharing. While for past birthdays, I have gone the extra mile with towering layer cakes, fancy soufflés, and beautiful bundts, this year I wanted something simple. Perhaps it is my advancing age spurring me to laziness, but I just didn’t want to spend half my birthday on baking. However, I also wanted something decadently chocolate-laden.  This cake exceeded my expectations on all accounts.


This is the easiest and quickest cake recipe I have ever encountered that doesn’t compromise one bit on flavor. It tastes like a perfect hybrid between cake and fudge with a slightly crackly exterior that gives way to a moist and deeply chocolaty interior, and then it all gets covered in ganache that cools to the texture of truffle filling. It made a nice end to a very good birthday.


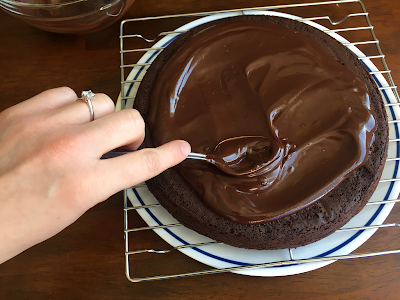
Stirring Ganache


The original recipe comes from the King Arthur Flour blog. I have made a few alterations, one of which is to bake it in a 9-inch round baking pan (because I don’t own an 8-inch one). If you choose to use an 8-inch pan, you will likely need to increase the baking time to about 25 minutes, as in the original recipe.

Fun Fact: I calculated some baking pan dimensions for you because I do this all the time for myself and forget to write the information down. I frequently substitute pan sizes in recipes with pan sizes that I actually own, but I like to be aware of the differences so I can adjust baking time accordingly.

8-inch diameter round pan: 50.24 sq. in.
9-inch diameter round pan: 63.59 sq. in.
8-inch square pan: 64 sq. in.
9-inch square pan: 81 sq. in.
9 x 13-inch pan: 117 sq. in.


Flourless Chocolate Cake
Adapted from King Arthur Flour (blog.kingarthurflour.com)

Cake:
1 cup semisweet chocolate chips
½ cup (8 Tablespoons, or 1 stick) butter*
¾ cup sugar
pinch of salt*
1 teaspoon vanilla extract
3 large eggs
½ cup unsweetened, Dutch process cocoa powder

*if you use unsalted butter, increase the salt to ¼ teaspoon

Ganache:
1 cup semisweet chocolate chips OR chopped semi- or bittersweet chocolate OR a combination**
½ cup heavy cream
Chocolate covered caramels or other decorative candies, optional

**Both taste great, but it’s easier to get a smooth, picture-perfect ganache with the bar chocolate because it doesn’t have stabilizers

Preheat the oven to 375 degrees Fahrenheit. Grease the bottom and sides of a 9-inch cake pan lightly with butter. Cut a circle of parchment paper to fit in the bottom of the pan, and grease the top of the paper as well.

Place the chocolate chips and butter together in a medium large, heat-safe bowl. Melt the chocolate chips and butter together in the microwave, heating for 30-second intervals and stirring in between, until both are melted and smooth. (This step can also be done in a glass bowl set over a pan of simmering water.) Once the mixture is melted, stir in the sugar, salt, and vanilla. Add the eggs, and stir to break up and fully incorporate. Mix in the cocoa powder, just until combined.

Pour/scrape the batter into the greased cake pan, and bake for about 18-20 minutes until the top has formed a thin crust. (Sometimes I will check on it early, and the center of the cake wobbles a somewhat as I’m pulling the rack out. You don’t want a liquid center, but you don’t want the cake totally dried out either. The original recipe says the center should be 200 degrees Fahrenheit, but I don’t have a thermometer conducive to testing a shallow cake…) Remove the cake from the oven, and let cool in the pan for 5 minutes. Then cut around the edge of the cake to release it from the sides of the pan, and invert pan onto a cooling rack. Remove parchment, and let the cake cool completely.

Once the cake is cool, make the ganache by placing the chocolate and cream together in a heat-safe bowl. Heat in microwave for 30 seconds or so, until the cream is hot enough to melt the chocolate when you stir. If it needs additional heating time, return it to microwave for short intervals (10-15 seconds), stirring in between, until fully melted. (As with the first step of the cake batter, this can also be done in a glass bowl set over a pan of simmering water.) Pour the ganache over the top of the cake, and smooth it out with a knife or the back of a spoon, letting it reach the edges of the cake to run down the sides. If using, place decorative candies on top of the ganache. Let the ganache set for 2+hours, and enjoy!